You are here
Create A New Page - Advanced Menu
This is where things can get tricky. If your site is large enough that you want to create groups of pages in your menu, then we call that "Nested." This takes a little thinking on your end, but it can be done. Let me explain how to build a "Nested" web site.
PLAN PLAN PLAN. Before you start typing away on your computer, know what goes where.
As an example, I will use the Criminology site. Here is their side menu. 
See those little arrows on the right side of each link? Those are called carrots in web terms. A carrot means that the link does NOT go to a page, instead, that is a group of pages. When you click on one, instead of going to a page, it opens to show you the group. Example: The Events group.

The Events group has three listings under it. Upcoming Events is a page. Newsletter is a page, then, the Looking Back section is another group. You know this because of the carrot on the right side of the name. You can make groups in groups all you like.
Okay! We have the info done. Now, how do we build this?
A link can only be one of two things in Drupal.
1. A Link that goes to a page.
2. A Group title.
That is it. It can't be both, just one or the other.
To make a group, you must first make a new page. Follow the instructions on making a blank page. Give that page the name (Title) of the group and publish it.
Right now, you have a blank page on your site.
Now comes the part where you turn your page into a group.
To turn a page into a group, you just publish a different page "under" it.
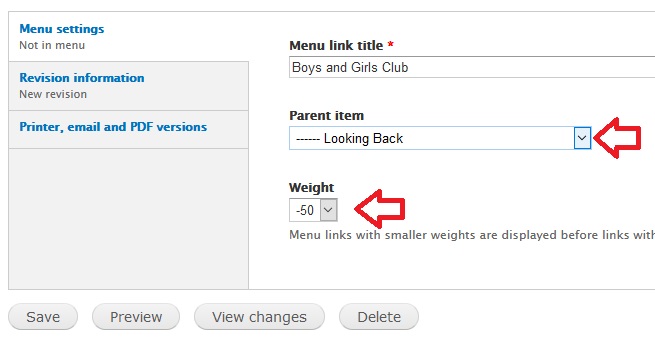
Let me show you. When you have a page you want listed under a group, all you have to do is tell the system to move your page under a parent. The parent is just a blank page but Drupal will make the change for you. Drupal will automatically turn your page link in the right menu into a group link.
You can make new pages and add them or move old pages. You do this in the Parent Item under Menu when you do a new draft.

When you click on the parent item, it will list everything on your site. BE CAREFUL! Don't make a page a partnet item unless you plan ahead. You never want to try to have a page be both a page and a group title, because the link to the page breaks when it becomes a parent.
I have also highlighted the Weight area. This is the section that tells your page where it should be in the menu. The numbers go from neagtive 50 to positive 50. (Math!) If you don't plan to have more than 50 pages in your group, we can just use 1 to 50. (Less Math!)
The larger the number, the more weight the page has and the lower it will sink in the menu list. So, if you have 6 pages, you can number them 1,2,3,4,5 and 6. Or you can go by 5's or any other combo you like. I try to use 5's to give me room to add new pages later on. Then the menu will put the lightest pages on top and the heavy pages lower in the menu. Each group has their own menu system so this counts only in your group, not your whole website.
You can also move any page to a different group any time you like. Just log in, do a new draft, change the parent item, and publish.
If you have New events and Old events, once an event ends, move the page from New to Old and publish.
Remember, once you place pages to a parent item, the parent page changes the link from a web page to a group title. Do NOT put info on that parent page because it will not be found by your users.
I hope that makes sense. It is a lot to take in but once you get it, it gets easier. If things get confusing, contact me and we can run through it in person.
